Cheap-ish AI HomeLab on a budget: V100s, Custom boards, and NVLink
I recently went on a crusade to find the best bang for the buck starter AI GPU cluster. Ive been some GPU’s for a big but found myself needing more. Unfortunately, since starting the self hosted AI journey, the prices for used GPUs have only gone up! Thankfully there are creative solutions now for us homelabbers now to choose form.
The Current Setup
Currently, I have the best bang for the buck gpus, the Nvidia Tesla P40. Its around 200USD on ebay and its been serving me well for 2 years. If you want the ultimate value for maximum VRAM per dollar, the Tesla P40 cant be beat. Its essentially a GTX 1080 Ti at slightly lower clock-rate with 24 GB of VRAM with no fans and a EPS 12v 8 pin CPU power connector. Why EPS 12v instead of PCIe 8 pin? Well it supports up to 300 watts of power vs the 150 watts that PCIe power connectors support. Why passive cooling? Welp its meant to go into a system that has high airflow from CPU fans. For me, Ive been using it in a dell R730 and R740 with no issues for years and for the price, it cant be beat.
But what if you want more than 24gb of vram can do? You might think just get another and have them run together, but alas, PCIe 3.0 x16 is too slow for AI tasks. once you bridge past 24g of vram, you compute slows to a crawl thanks to the limitation of slow PCIe 3.0 link speeds. Think going from 60 tokens a second to like 5 tokens a second. Buy a card with more vram you say? Welp unfortunately anything with 40+GB of vram is 3k or more. You can get a V100 for just under 1k USD, but it has scaling with multiple gpus due to the throughput limitations of PCIe. If PCIe, the fastest bus on computers is too slow, what else is there? Welp, NVIDIA thought of this awhile ago, and NVLink is your answer.
NVlink and SXM overview
NVLink is a proprietary protocol that allows nvidia GPU’s to communicate with each other over a very fast link, 300gb/s in total bandwidth to other card’s video memory (at least with SXM3). That is 19x faster than a PCIe 3.0 x16 link! With that speed comes another tradeoff, It requires the use of a proprietary NVIDIA SXM module to do it. So buy a server that supports SXM modules… easy right? Eh, not really. Everyone wants them so even old used ones are hard to find for less than $5000 USD, so we need a more homelab friendly budget option.
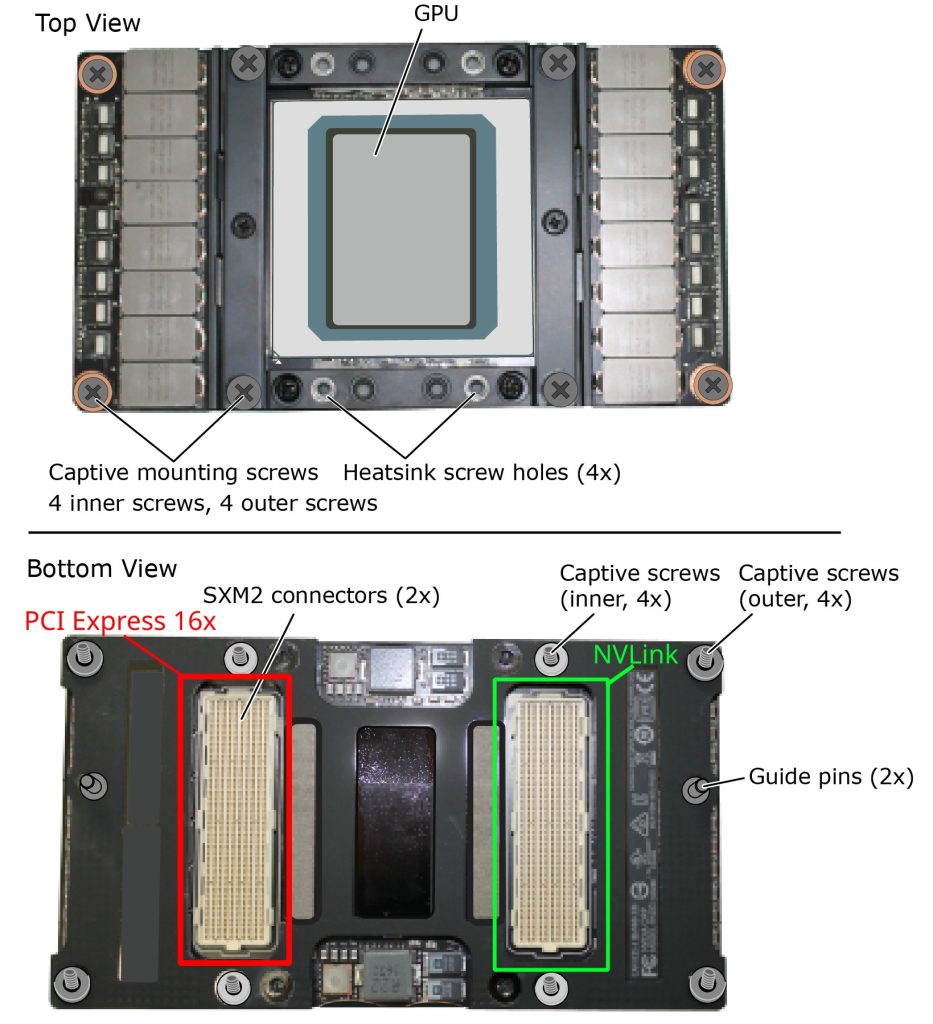
Thankfully, SMX modules are not that complex and use pretty off the shelf protocols under the hood. They run off of 12v DC power and are entirely self contained with the power VRM’s, memory, and GPU all on one board. On the bottom, One of the connectors is just regular PCIe and the other one is a NVlink connector we are most interested in. The NVLink connector also does not need anything really special, you can easily connect 2 modules together. With 4 or more though, it requires special chips to handle the multiplexing with other chips. NVlink runs at half duplex, so 150GB/s read, 150GB/s write to the other GPU’s. See the diagram below:
Thanks to this use off simple off the shelf standards, there are loads of adapter boards for these things.
SXM2 adapter options
Ebay and other sites have lots of options for sxm2 module adapter boards. The most popular ones are a single module on a PCIe card. While this works, you dont get nvlink support. There are 2 slot options, 2 slot options with the kit needed to make it work, and a 4 slot option. Each version has their pros and cons, but generally they share the same features: 8 pin EPS CPU power connectors for powering the GPU, a sxm2 slot, and little to no instructions.
My requirements were simple:
- At least 64GB of VRAM
- Needs to be cheaper than buying a native server
- Needs to have working NVlink
- Cannot be very loud
To fit though requirements, I ordered this mystery kit from ebay. It came with:
- The SXM2 interface board
- 2x PCIe 3.0 x16 to 2x SFF-8654 external connectors. Came with a full height and half height bracket
- 4xSFF-8654 cables.
The star of the show is pictured below:
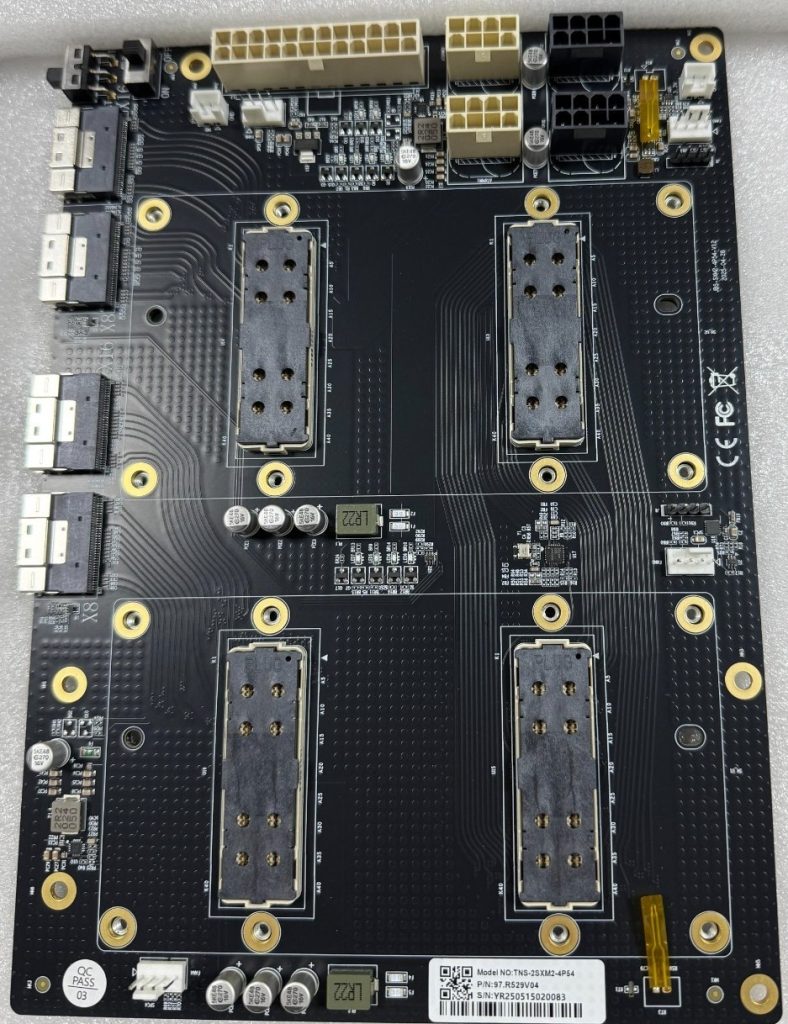
The board is quite simple but built with some interesting features.
- 6x fan headers (supports both DC and PWM Fans)
- A switch that enables PCIe power control for the board or override to always on (AT and MT)
- Onboard power regulation, fan controllers a what look to be temperature probes
- Debug headers
For the power, I connected the ATX connector as well as 2x cpu power connectors with a 700 watt psu.
To use SXM2 modules in your system, you BIOS/UEFI must support the following:
- UEFI boot enabled, Legacy CSM boot disabled.
- Your host OS Booted using UEFI (windows or linux)
- Enabled “Above 4G Decoding”
- Enabled “Resizable Bar” or “Large Bar Support”
Id also highly recommend enabling SR-IOV, PCIe ARI, and Enhance PCIe error reporting (in bios’s that support these features)
My Host System Hardware
Initially, planned putting it in my Hypervisor, a Dell R740. It passed through to the VM’s fine and drivers worked. However there was one huge issue, The Dell fans would ramp up to max speed after 5 min. Try as I might, Dell’s idrac9 software does not allow you to ignore PCIe temp readings on “dell” equipment. Im not sure if I was just unlucky and these SMX modules are dell or if the PCIe addresses were getting interpreted wrong, but idrac would not let me disable thermal controls for this PCIe card. I could for the other cards, but not these. As noise was one of my main concerns, I needed a new non traditional “server” solution.
Enter my fallback option, my old threadripper workstation. its specs are as follows:
CPU: AMD Ryzen Threadripper 2950X
Memory: 32GB DDR4 3200MT/s
Motherboard: X399 AORUS Gaming 7
Networking: 2x25gbit
System PSU: 600 watt PSU I had laying around
GPU Fans: 4x ARCTIC P8 3000rpm 80mm
GPU Power supply: 750 watt PSU I had laying around
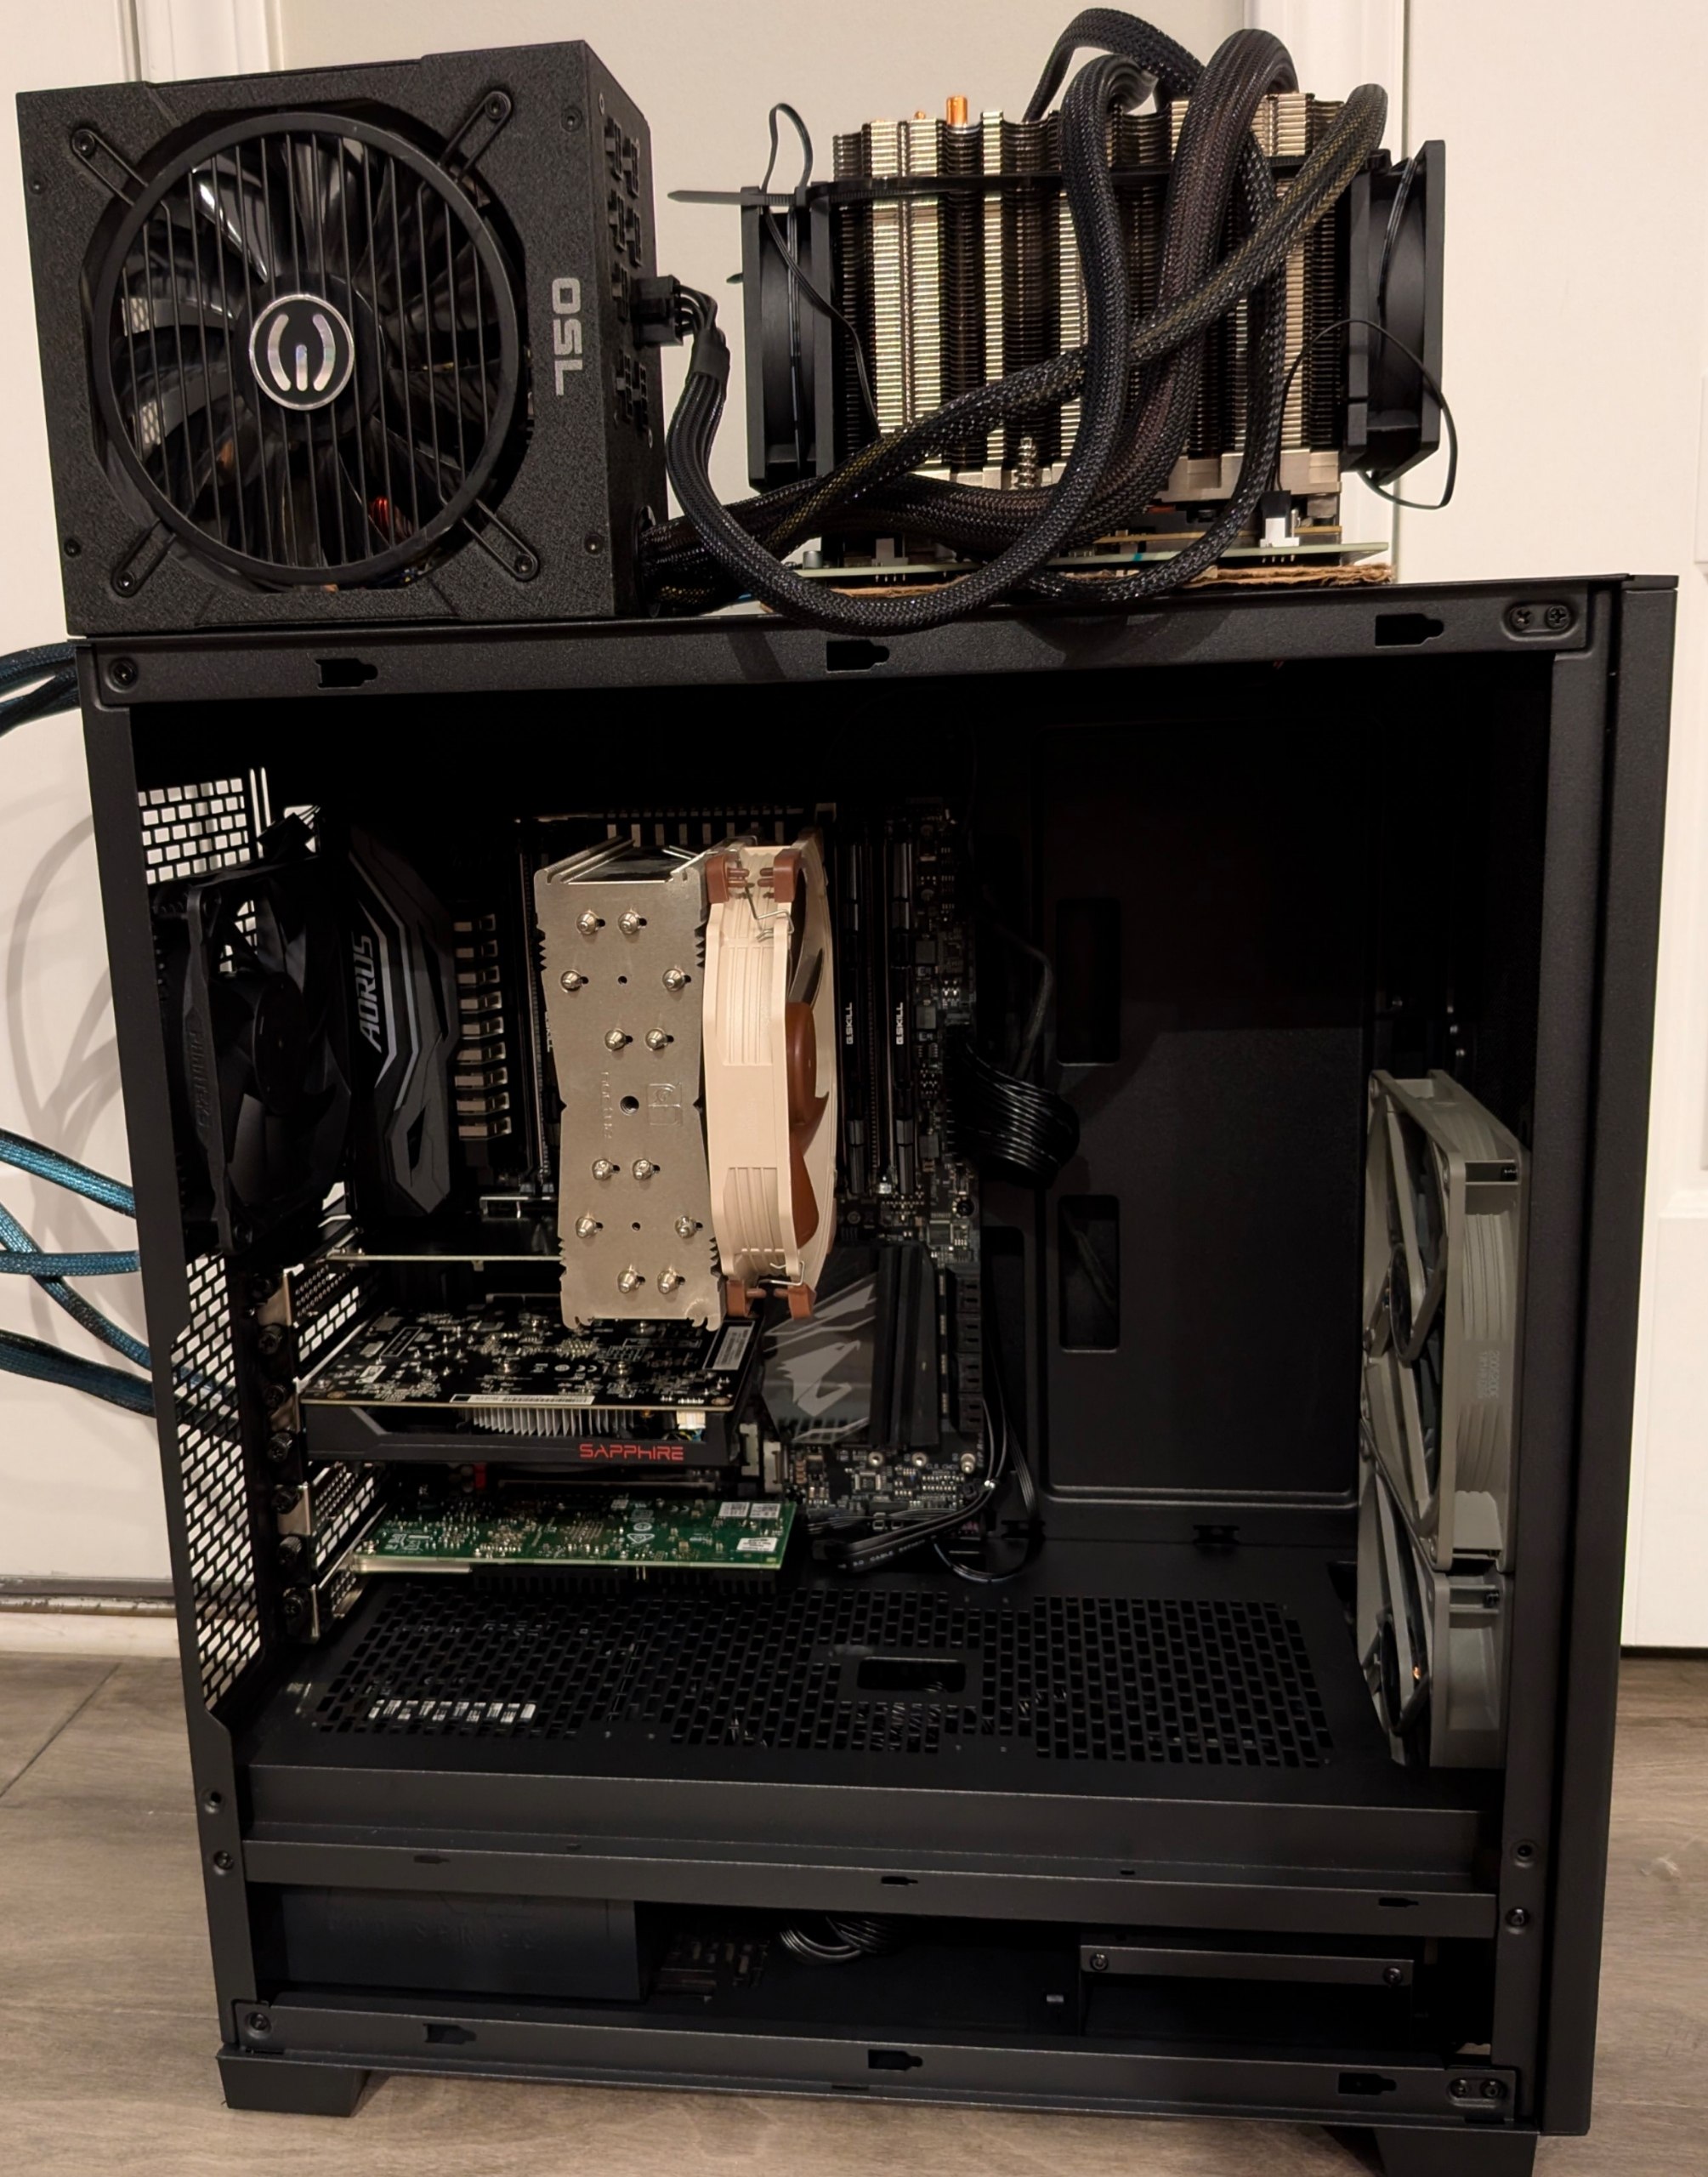
Case: Phanteks XT Pro
I wanted to have all 16x PCIe lanes for both of the cards so model loading would be fast. For this, I also have the storage as a samsung 970 pro ssd just for the models because I had it laying around. You can easily have these connect over a single PCIe card slot with a 8x/8x bifurcation or get a PLX chip version of the kit if your motherboard does not support PCIe bifurcation. Mini PC users could also do some shenanigans to get them connected on a M key M.2 slot and it should work.
The GPU cooling fans I went with the Artic P8’s. It was 20 bucks for a pack of 5 on amazon. You can definitely get away with lower speed ones but I think the high static pressure is good for these dense heatsinks. My temperatures never have gone above 55c. If you want to, you can 3d print proper ducts for them, but I just decided to stick em on with zip-ties. Why? Because it makes it possible to remove them easily if I need to.
The Case was not that important to me. Initially I wanted to go rackmount but after realizing that it would likely be a deep 3 or 4u system, I decided against it and instead with with the Phanteks XT pro because it was cheap and I could fit my GPU board on the top of it with no issues.
Things I’d change for my hardware
- Get a lower power base system. AM4 would be a great platform with a mid to lower power 8 core.
- Get 80+ gold or better PSU’s. They will save you money long term.
- More PCIe based storage (nvme) the better, as it makes model loading much faster. Your going to be limited to what your GPU PCIe is running at, so plan for 4-8GB/s sequential read. You could even save money and get the DRAM-less SSD’s and they dont really effect sequential reads.
- Smaller Case. As i was reusing a threadripper, that was not really an option, but those m-atx cube cases would be perferct for this
- Power supply break out boards for server psu’s: HP and Dell power supplies have PCIE and CPU power breakout boards. Consider it for the gpu board.
- Get a IPMI solution, either an addon like the JetKVM or a server motherboard with it buitin
The Host OS
For the host OS, Anything “linux’ goes I guess, but for myself I chose CachyOS. Does arch linux make a good server OS? I dont think so in most cases but for AI use cases I think its decent because:
- The latest packages for everything, AI tools are using bleeding edge stuff many times
- The CachyOS Kernel is very optimized and fast, so your getting the most our of your hardware, epically on amd zen4+ and skylake+ systems
- The arch linux user repository has a wealth of great premade pacakges for AI stuff, making updates much easier.
- Nvidia drivers are easy to install and manage via pacman, including out of support drivers like Nvidia 580
- Lightweight, so no unnecessary bloat or additional process that dont need to be running.
Whatever host OS you choose, make sure the tools you want to use support it and the nvidia drivers work for it. Many AI tools are just docker so it does not matter all that much. Long term, something with a kernel that supports the nvidia 580 drivers might be your best bet for the best “server appliance”
For kernel parameters, make sure to add:
initcall_blacklist=simpledrm_platform_driver_init
And for the nvidia drivers make sure to disable the framebuffer:
/etc/modprobe.d/nvidia-drm.conf:
options nvidia-drm fbdev=0
This will make it so the system wont try to use the cards as a frame buffer. This can cause the system to hang at boot depending on your PCIe device priority list. Dont do this if have other nvidia cards acting as a display. However, I recommend you run this system headless or with a non-3d capable gpu so ai tools dont try to use it for compute.
Also enable power savings
/etc/modprobe.d/nvidia-power.conf:
options nvidia NVreg_DynamicPowerManagement=0x02
The Results
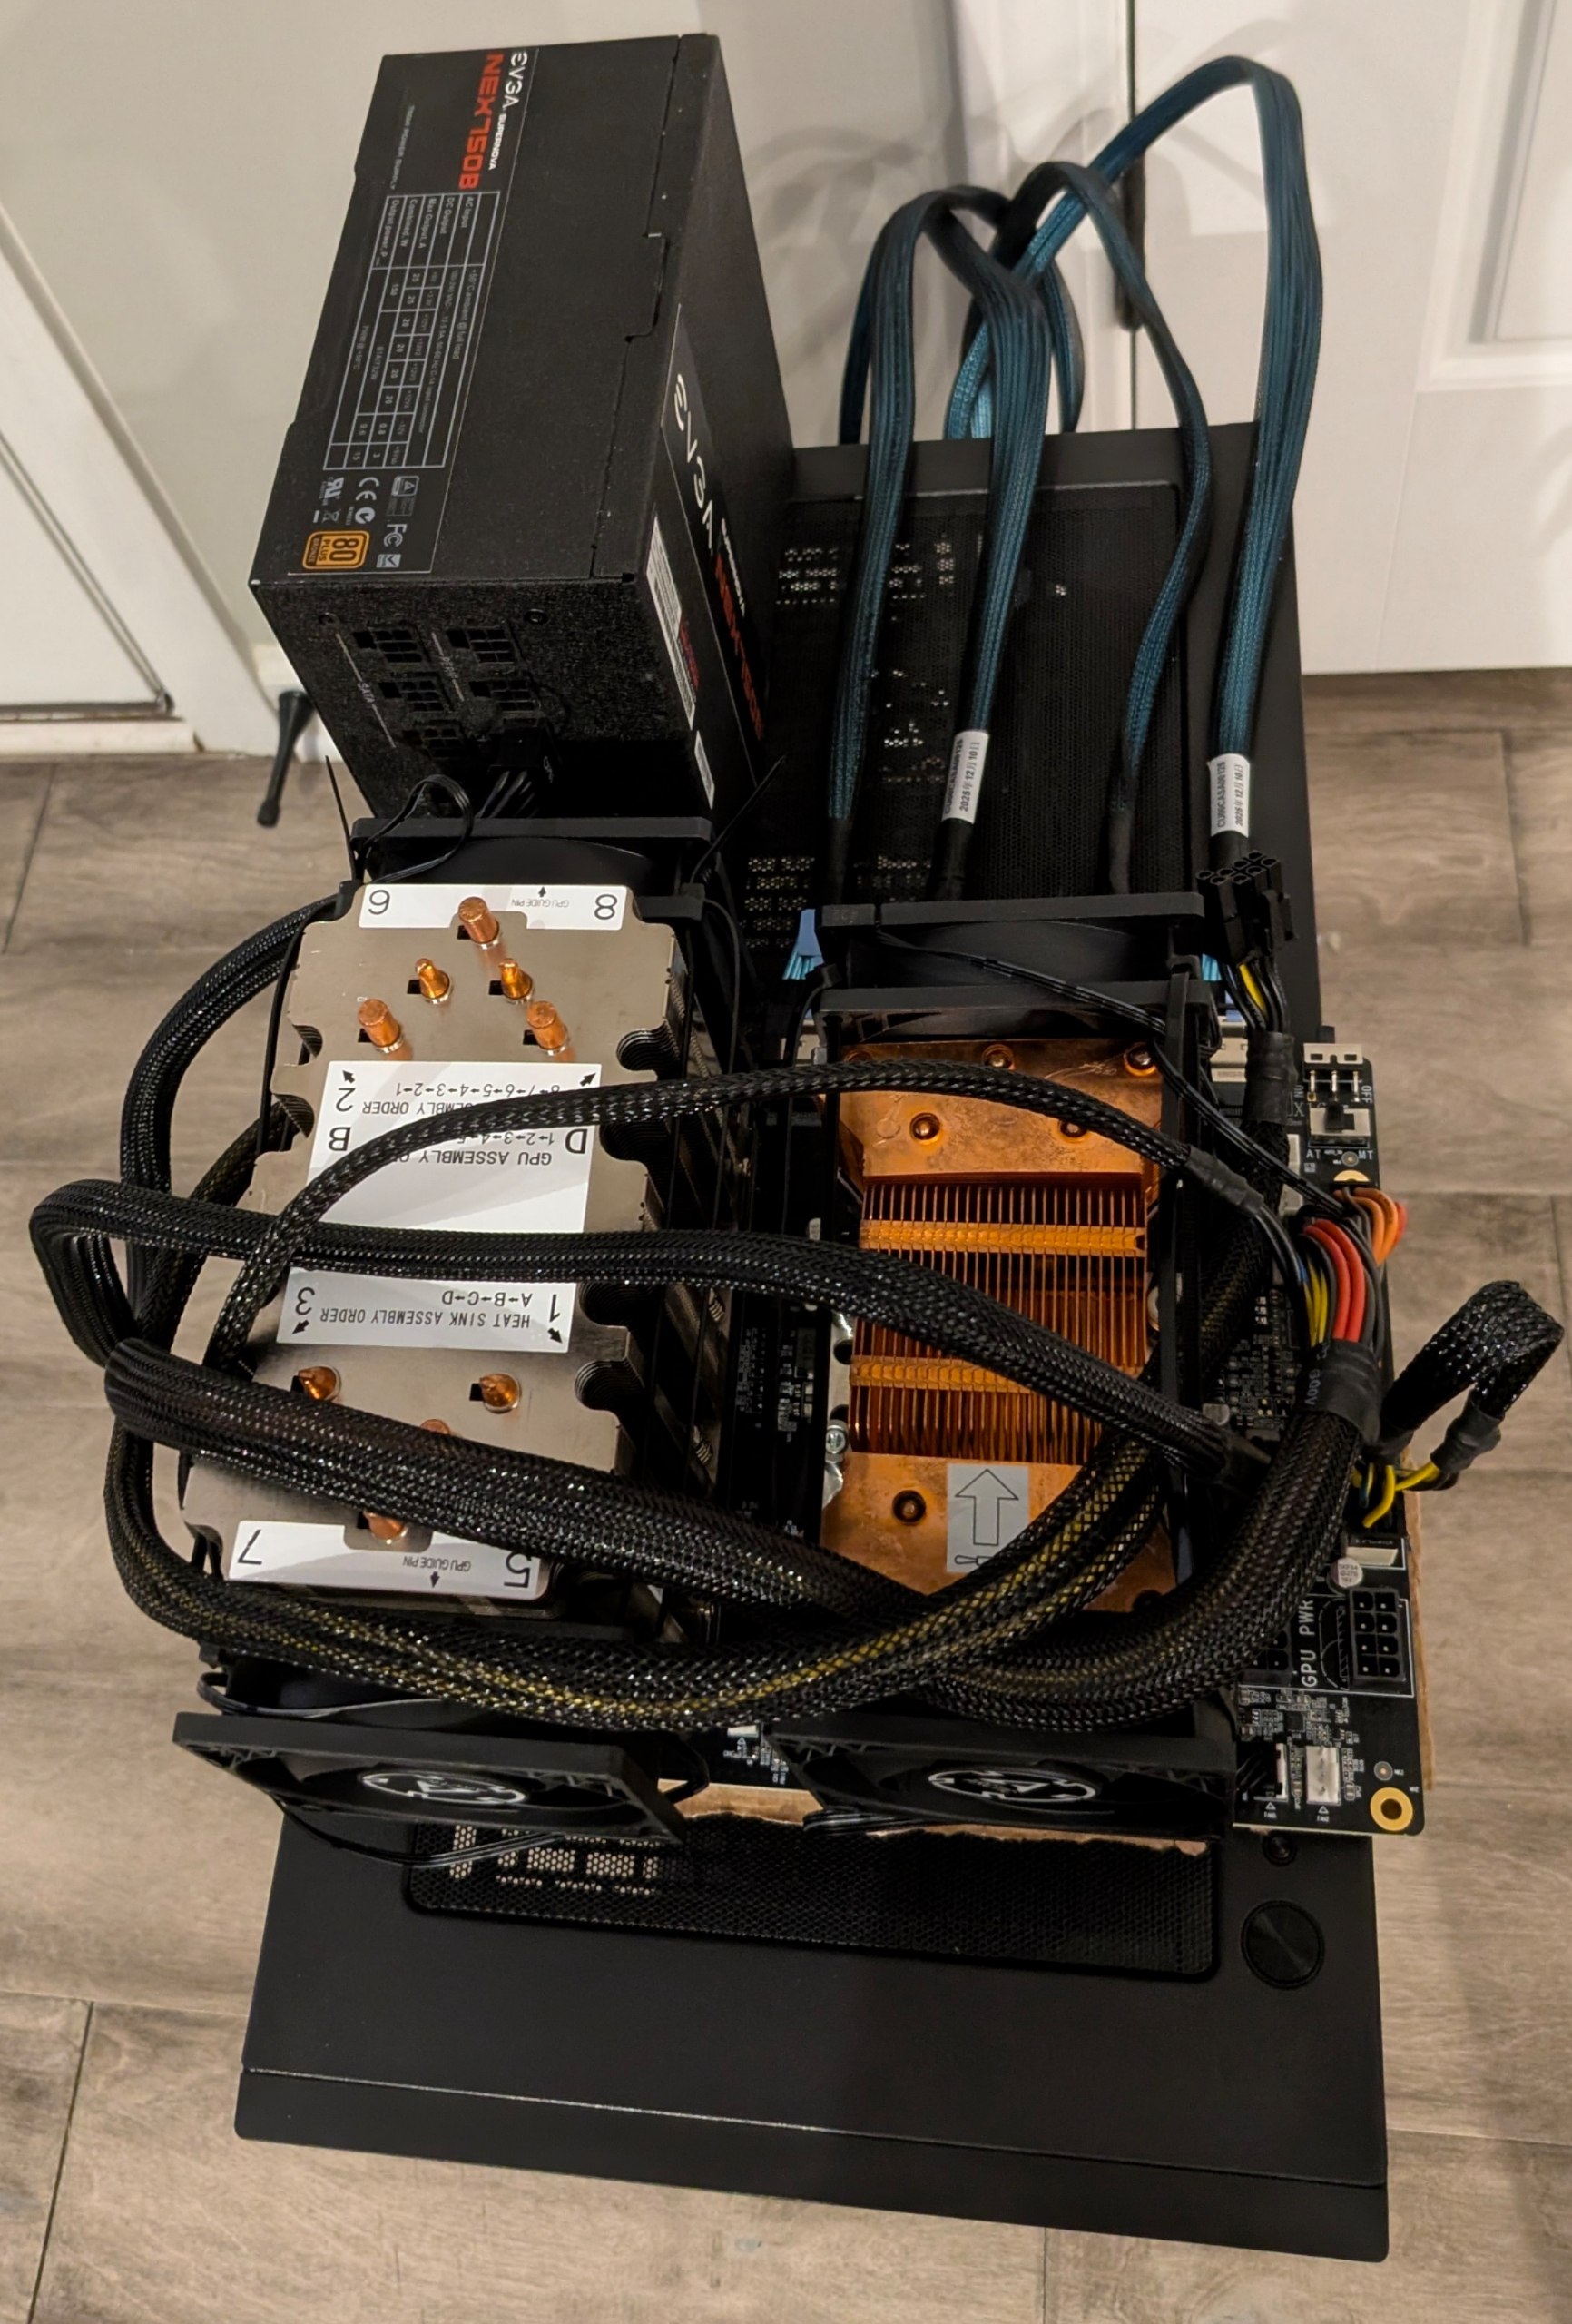
The final build looks a bit… sketchy, but it works! I used a sheet of cardboard to insulate the GPU board from the system and secured the second power supply, GPU board, and the cardboard with 3M VHB tape. The final build looks like a project car with the engine sticking through holes in the hood, but it gets the job done.
First boot
On the first boot, It did not initally work. I swapped the sff cable locations and it worked fine after that. Both the GPU’s show up at 16x lanes! I also had to install the nvidia-580xx-dkms and nvidia-580xx-utils driver branch as the nvidia-open drivers don’t work.
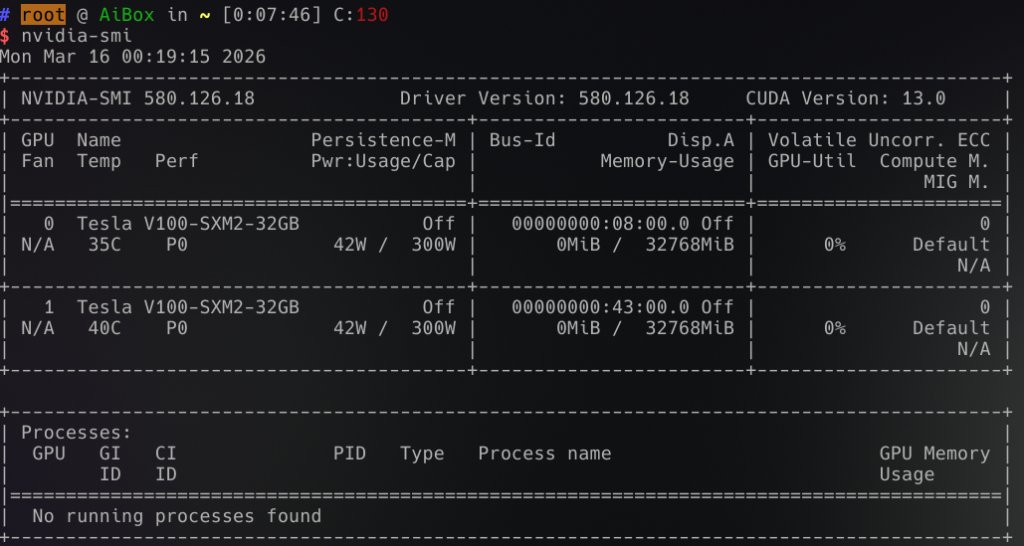
NVLink also works!
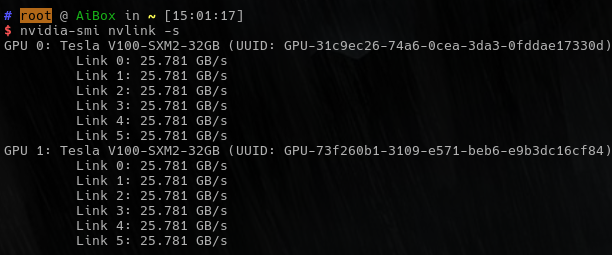
Everything appeared to be working fine. I had some issues with the console to try to attach to these gpu’s which caused some issues. I got these fixed by putting in the config changes I mentioned above. But other than that, it just worked!
Ollama test results:
Tested with ollama version 0.18.0. There is still optimization to do on the system, but it was mostly performant out of the box. I used the script ollama-benchmark to test the results
| Model | Prompt Processing (tokens/sec) | Generation Speed (tokens/sec) | Combined Speed (tokens/sec) | Input Tokens | Generated Tokens | Processing Time (s) | Generation Time (s) | Total Time (s) |
| qwen3.5:35b | 266.21 | 65.04 | 65.53 | 35 | 3525 | 0.13 | 54.2 | 68.67 |
| qwen3-coder-next:q4_K_M | 165.05 | 54.18 | 54.91 | 33 | 1624 | 0.2 | 29.98 | 54.41 |
| qwen3-coder:30b | 280.11 | 98.84 | 100.2 | 33 | 1543 | 0.12 | 15.61 | 25.98 |
| gpt-oss:20b | 513.56 | 119.43 | 125.08 | 92 | 1472 | 0.18 | 12.32 | 20.3 |
| phi4:14b | 343.91 | 70.69 | 74.2 | 35 | 552 | 0.1 | 7.81 | 14.19 |
| lfm2:24b | 400.11 | 138.48 | 143.83 | 35 | 581 | 0.09 | 4.2 | 11.52 |
| llama3.2:3b | 423.81 | 207.62 | 219.43 | 50 | 424 | 0.12 | 2.04 | 5.57 |
| nemotron-3-nano:30b | 256.95 | 122.51 | 123.64 | 43 | 2411 | 0.17 | 19.68 | 32.04 |
The gotchas with this setup
- I’m not sure if being in manual mode is effecting this, but the SXM2 modules dont power save well. Each module pulls 42watts according to nvidia-smi
- Driver support on these V100’s going forward are iffy. 580 is the last officially supported gpu version with cuda 12.
- Some AI tools and models require Turing or Ampere to work.
- Resale will be harder
- The physical space this setup takes is quite large. I wish it was 2u rack mountable.
Closing thoughts
After using this for 3 weeks and $1300 out of my pocket, do I regret my decision? Nope! Its been rock solid. Its been running qwen3, nemotron3, and other models great. I met my goals and then some. I definitely worry about the resell value of this stuff, but thats a future problem. Today im able to comfortably use AI at home to do real coding and log parsing duties with no worry of token spend or privacy worries. Eventually ill get to the optimization phase of the project and deploy something like vllm which is faster, but ollama is easy and it works. When the current SXM5 modules get pulled from the maybe AI bubble crash I think id do this again with more power. Love it or not, AI is here to stay, so I think an appliance like this will be useful. Id love for someone to make a thing that supports NVMe over Fabrics or maybe even regular ethernet! Who knows what the future holds, but so far ive been quite impress with what this older, pre-AI boom hardware can do.