PowerCLI Basic Scripts: Bulk Export All Virtual Machines in a Folder
Have you ever wanted to mass export virtual machines? I know I have and its infuriating that the web GUI does not have this option built into it. So I went and pulled some good ol’ duct tape engineering and made a somewhat functional script for it.
Firstly, we need to connect to the VMware vCenter server. This commandlet allows you to pass credentials in the command/script, or by using the PowerShell equivalent of readline. So if you’re okay with being insecure and bad habits, remove the # and fill in your credentials.
Connect-VIServer -Server YourVcenter.full.tld #-User [email protected] -Password Password123!
If you have an invalid SSL certificate, make sure to add this before the line above to ignore the issue and continue anyways:
Set-PowerCLIConfiguration -InvalidCertificateAction Ignore -Confirm:$false
Now we need to figure out the folder structure, creating a Get-Folder "FolderName" for each time we enter a folder. For mine I enter 2 folders where VM’s are contained.
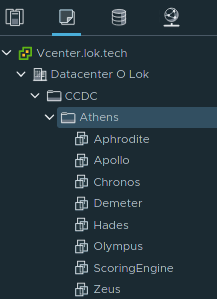
For me, this would be 2 total get folder commands. So it would be:
Get-Folder "CCDC" | Get-Folder "Athens"
We then need to get the output from that last folder and sort the output, selecting only the name.
| Get-VM | Select -ExpandProperty Name
Next, we need to format the list as a string to sort out the weirdness
| Out-String | Format-list
Next, we need to set a location of the output text file that contains all of the virtual machines we are going to export. I am using “C:\Temp\dump.txt”.
I tried to use a variable, but PowerCLI had a stroke when calling that variable, so I am using an output file. If you have a method that does not need a dump file, please post it in the comments.
| Out-File C:\Temp\dump.txt
The complete one-liner would be:
Get-Folder "CCDC" | Get-Folder "Athens"| Get-VM | Select -ExpandProperty Name | Out-String | Format-list | Out-File C:\Temp\dump.txt
Now we need to load that dump file we created into a variable. Make sure to replace it with your dump file
$vm_names = Get-Content C:\Temp\dump.txt
Next is the fun part. Actually exporting the VM’s, or VApps as VMware calls it. From here there are some options you can add. The Export-VApp line is the actual command that exports the VM. You will need to set an output directory for this to work. In my case, it’s a network drive S:\Athens. If you want to export all of the virtual machines at the same time, add “-RunAsync:$true” I caution against using it because it will not increase export times, as it seems there is a hard cap of about 10-20MB/s when exporting VM’s and it is much harder to keep track of the completion process. I also disabled the creation of a separate folder for each VM. I also specified the format be OVF, which is the one that the VM is split into multiple files. If you want a single file the specify OVA.
foreach ($vm_name in $vm_names)
{
Get-VM -Name $vm_name | Shutdown-VMGuest -confirm:$false # This will shutdown the VM before export.
Get-VM -Name $vm_name | Get-CDDrive | Set-CDDrive -NoMedia -confirm:$false # This will remove any CD in the drive.
Get-VM -Name $vm_name | Export-VApp -Destination 'S:\Athens' -Format OVF -CreateSeparateFolder:$false
}
This script is pretty modular, so you could for example switch out the commands to instead of exporting a VM, change a network adapter to # port group, Bulk shutdown/startup machines, Mass delete VM’s, etc. If you found this helpful, please consider donating to us. Our server hosting is about 15 bucks a month, So every bit helps.
Complete script:
Set-PowerCLIConfiguration -InvalidCertificateAction Ignore -Confirm:$false
Connect-VIServer -Server vcenter.lok.tech #-User [email protected] #-Password

Get-Folder "Folder1" | Get-Folder "FolderInsideFolder1" | Get-VM | Select -ExpandProperty Name | Out-String | Format-list | Out-File C:\Temp\dump.txt

$vm_names = Get-Content C:\Temp\dump.txt

foreach ($vm_name in $vm_names)
{
Get-VM -Name $vm_name | Shutdown-VMGuest -confirm:$false
Get-VM -Name $vm_name | Get-CDDrive | Set-CDDrive -NoMedia -confirm:$false
Get-VM -Name $vm_name | Export-VApp -Destination 'S:\Athens' -Format OVF -CreateSeparateFolder:$false
}