Firewalls: How to setup a basic firewall using UFW, iptables, nftables, or firewalld
This article will be covering how to setup a basic firewall using each of the four main methods of doing so. I’ll leave covering advanced stuff to James, as he’s been somewhat obsessed with learning the complicated aspects of firewalls recently, but the basic are also important.
UFW
I’ll start with the simplest one. UFW is a simple frontend to iptables that makes it easy to block and allow ports and have persistence across reboots. Most major distributions have it available in their standard repositories of packages.
So to start off, installing the packages is usually done with some variation of:
apt install ufw
pacman -S ufw
Or whatever applies to your distro. Once the install finishes, we can start making rules.
As I said above, this is just going to be a basic firewall, so no fancy forwarding or even logging. Just blocking and allowing ports.
ufw default deny
ufw allow ssh
The first command will block all incoming traffic by default, as well as set forwarded traffic to deny. The second will allow inbound SSH traffic, so that when we turn the firewall on we will still have access.
If needed, you can also specify a protocol for UFW to allow in. For example, pretending this is a DNS server:
ufw allow 53/udp
Once you are happy with the ports that you have allowed (make sure that you will still have access!), you can start the firewall with:
ufw enable
ufw status verbose
And ta-da, you have a basic UFW firewall!
firewalld
firewalld is Red Hat’s baby, and is kinda like UFW on steroids. It is also a frontend to nftables or iptables, but is significantly more powerful and can handle multiple rulesets. For example, it allows you to have different rules for different nics, as well as runtime and permanent configs (think Cisco IOS and having to do “commit; save” in order for rules to survive reboots).
If it is not pre-installed on your server, it can usually be installed as the firewalld package. For example on Arch:
pacman -S firewalld
And then the service will have to be started and enabled:
systemctl start firewalld
systemctl enable firewalld
firewall-cmd --state
As I said earlier, this is just going to be a basic overview of each option. So I won’t be going over how to having different zones for each interface and such. Just one zone on one interface.
To start with, to set the default policy to drop all traffic that doesn’t match our allow rules, we can set the default zone to drop:
firewall-cmd --set-default-zone=drop
This will make the change immediately and permanently, but established connections will be maintained. And now to allow future SSH traffic into the machine, we can do:
firewall-cmd --zone=drop --permanent --add-service=ssh
The --permanent flag will make the change persist across reboots, removing it will have the change only be present until firewalld is reloaded.
Now, going back to the DNS server example used above, you can specify a port and protocol to allow using a command like this:
firewall-cmd --zone=drop --add-port=53/udp
And like when adding a service, including a --permanent will make the change persistent.
With that, you have a basic firewalld firewall. firewalld do can do way more than just this if you dig deeper into its documentation, though! So it could be worth it to do so.
iptables
The programs so far have both been frontends to iptables that aim to make it easier to interact with. But by doing so, some of the power granted by iptables is lost. However, that is the sort of thing I’ll leave to James to cover some day.
It is very likely that iptables is already installed on your system. If not, install the “iptables” package. You do not need to start a service for it, but you will potentially need to enable one. For now, we will set rules up. To make sure that we won’t lose connection to the box, first allow established traffic:
iptables -A INPUT -m conntrack --ctstate ESTABLISHED,RELATED -j ACCEPT
And now we can safely set the default policy to DROP, like so:
iptables -P INPUT DROP
This will block all traffic by default, but rather than informing the client it was denied, the server will allow the connection to timeout. And now to allow traffic in we can do:
iptables -A INPUT -p tcp --dport 22 -j ACCEPT
iptables -A INPUT -p udp --dport 53 -j ACCEPT
That will allow incoming tcp traffic to port 22 and udp traffic to port 53.
Now to make these rules persist. On systems with OpenRC, you can usually do something like follows:
rc-update add iptables default
service iptables save
And on systemd machines:
systemctl enable iptables
iptables-save > /etc/iptables/iptables.rules
Both examples will write the rules to a file and then load them back in on reboot. If you use systemd and do not have an iptables.service file, here is what mine looks like:
[Unit]
Description=IPv4 Packet Filtering Framework
Before=network-pre.target
Wants=network-pre.target

[Service]
Type=oneshot
ExecStart=/usr/bin/iptables-restore /etc/iptables/iptables.rules
ExecReload=/usr/bin/iptables-restore /etc/iptables/iptables.rules
ExecStop=/usr/lib/systemd/scripts/iptables-flush
RemainAfterExit=yes

[Install]
WantedBy=multi-user.target
Save that as /usr/lib/systemd/system/iptables.service, and then enable the service. The iptables-flush script it references looks like this:
#!/bin/bash
#
# Usage: iptables-flush [6]
#

iptables=ip$1tables
if ! type -p "$iptables" &>/dev/null; then
  echo "error: invalid argument"
  exit 1
fi

while read -r table; do
  tables+=("/usr/share/iptables/empty-$table.rules")
done <"/proc/net/ip$1_tables_names"

if (( ${#tables[*]} )); then
  cat "${tables[@]}" | "$iptables-restore"
fi
With that done, you should have a functioning iptables firewall!
nftables
iptables has been deprecated for a while now, and nftables is its horribly documented successor. Hopefully this remedies that a little bit.
There is a chance that nftables is already installed on your system, but if not the package is usually just called “nftables“.
First, start and enable the service:
systemctl enable nftables
systemctl start nftables
The starting ruleset may differ a little by OS, so nuke it:
nft flush ruleset
nft add table inet filter
After doing that, we will need to add our chains. For now the default policy for incoming traffic will be accept, otherwise we’ll lock ourselves out. To add our default chains, the commands are:
nft add chain inet filter input { type filter hook input priority 0\; policy accept\; }
nft add chain inet filter forward { type filter hook forward priority 0\; policy drop\; }
nft add chain inet filter output { type filter hook output priority 0\; policy accept\; }
The backslashes are required. Without them your shell will try to interpret this as listing several commands. Also, I’ve found that zsh requires that the {} be escaped as well.
And now to add the allowed ports., as well as traffic related to connections on those ports. That can be done like so:
nft add rule inet filter input ct state { established, related } accept
nft add rule inet filter input tcp dport ssh accept
nft add rule inet filter input udp dport 53 accept
Finally, to set the default policy to drop incoming traffic:
nft chain inet filter input { type filter hook input priority 0\; policy drop\; }
Running nft list ruleset will display the current rules, which should look something like this:
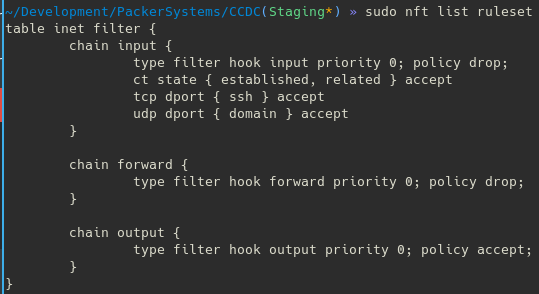
With that, you should have a functioning nftables firewall. To have it persist across reboots, the method is similar to iptables. With systemctl, it will usually read from /etc/nftables.conf.
nft list ruleset > /etc/nftables.conf
systemctl enable nftables
systemctl start nftables
Just a note: Deny (output input and forward).Allow 53 out 80 out and 443 out. Established or new leaving from 53,80 or 443 will be allowed back in no need to configure for INPUT.
Allow 22 in from other local computers. ufw allow 22.
I have been using only nftables for webservers, is it enough or shouldnI use also smt else? How to block by path based? Like allow only https traffic which contains “admin” in the path from certain IPs?
nftables is a great solution for a host based firewall. But the functionality that I think you’re looking for would need something like ModSecurity.
I’m new to the Linux world this is the best article I’ve found on this subject.