Arch: How to Install the Oracle Unbreakable Enterprise Kernel
Despite not really knowing what is so “unbreakable” about Oracle’s UEK, I find myself strangely fascinated by it. So I have taken it upon myself to figure how to compile and boot other flavor of Linux on it, which is simultaneously easier and harder than one might expect.
As I write this article, I am running through the process on an Arch VM. I’ll be going from booting the Live CD to rebooting on to the UEK.
The Standard Install Part
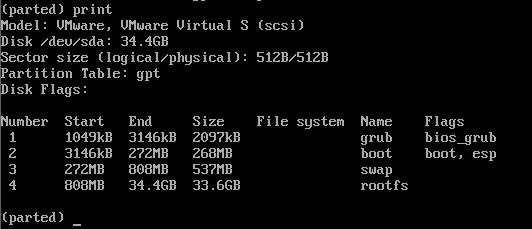
As the heading suggests, this part is just follows a standard Arch install, and since this process is decently we documented on the Arch Wiki, I won’t be explaining it too in-depth. For partition layout, I roughly follow what is suggested in the Gentoo handbook. Because I made the partition scheme GPT, I also had to set the boot flag on the boot partition:
parted -a optimal /dev/sda
mklabel gpt
unit mib
mkpart primary 1 3
name 1 grub
set 1 bios_grub on
mkpart primary 3 259
name 2 boot
set 2 boot on
mkpart primary 259 771
name 3 swap
mkpart primary 771 -1
name 4 rootfs
Next is making each partition the correct format and mounting them. For an EFI system, this usually means having the boot partition be FAT32. For a BIOS system, you can also use ext2.
mkfs.vfat -F32 /dev/sda2
mkfs.xfs /dev/sda4
mkswap /dev/sda3
swapon /dev/sda3

mount /dev/sda4 /mnt
mkdir /mnt/boot
mount /dev/sda2 /mnt/boot
Now that out filesystem is functional and mounted, we must pacstrap it. You can select the mirror closest to you by making it the highest uncommented URL in /etc/pacman.d/mirrorlist. When done with that, run:
pacstrap /mnt base base-devel
Finally, I’m just going to blitz through the rest of the commands up until installing GRUB. For me, this means:
genfstab -U /mnt >> /mnt/etc/fstab
arch-chroot /mnt

ln -sf /usr/share/zoneinfo/America/Los_Angeles /etc/localtime
hwlock --systohc

echo "en_US.UTF-8 UTF-8" > /etc/locale.gen
locale-gen
echo "LANG=en_US.UTF-8" > /etc/locale.conf

echo "archuek" > /etc/hostname

passwd
Now then, on to installing the GRand Unified Bootloader.
pacman -S grub
grub-install --target=i386-pc /dev/sda
grub-mkconfig -o /boot/grub/grub.cfg

exit
umount -R /mnt
reboot
The UEK Dependencies Part
When the reboot completes, we should now have a functional, if barebones, Arch install. But it’s on the wrong kernel, the boring vanilla-y Arch-y kernel, not the exciting UEK. Let’s start fixing this. In addition to the normal kernel build dependencies, we also need some UEK-specific ones such as DTrace.
libdtrace-ctf
The first dependency to install is libdtrace-ctf. The sources are available on Github, and also as an AUR package. The installation method is a matter of preference, but this article will detail installing it manually from source. First, I want to make a folder to hold the sources as we download them.
mkdir ~/sources
cd ~/sources
And now with that done, we can install the build dependencies for libdtrace-ctf and compile/install it.
pacman -S git zlib elfutils
git clone https://github.com/oracle/libdtrace-ctf
cd libdtrace-ctf
make
make install
dtrace-utils
We now hit an interesting conundrum of dtrace-utils needing a kernel with dtrace enabled, which the standard Arch one does not have. There are a few ways to solve this, but I will only detail what I feel to be the easiest one. Here is how to handle the kernel problem and get the Pacman-able dependencies that are still missing:
cd ~/sources
git clone --single-branch --branch uek5/master https://github.com/oracle/linux-uek
mkdir ~/sources/kernel/linux
cp -r ~/sources/linux-uek/include/uapi/linux/dtrace ~/sources/kernel/linux
pacman -S linux-headers linux-api-headers
This will allow us to have dtrace build using the sources from the UEK as a reference instead of the kernel that we’re currently running. With that done, let’s get the sources for and build dtrace-utils:
cd ~/sources
git clone https://github.com/oracle/dtrace-utils
cd dtrace-utils
make HDRPREFIX="~/sources/kernel"
make install
If you get a compilation error that mentions “undefined reference to makedev”, you can fix that by adding the following include to libproc/Psymtab.c:
@@ -23,6 +23,7 @@
  #include <sys/types.h>
  #include <sys/stat.h>
  #include <sys/ptrace.h>
 +#include <sys/sysmacros.h>
  #include <port.h>
  #include <setjmp.h>
Only the line with the + (don’t include the +), the rest is just for context on where it should go. After adding the include, try running make again and it should work. Like with libdtrace-ctf, there is also an AUR package that can be used instead of building manually.
dtrace-utils-devel
There’s a few needed parts from the dtrace-utils-devel RPM that don’t get installed by the libdtrace-ctf or dtrace-utils. The easiest way to get this is with an AUR package I’ve made. To install:
cd ~/sources
git clone https://aur.archlinux.org/dtrace-utils-devel.git
pacman -S rpmextract rsync
cd dtrace-utils-devel

makepkg -si
It may complain about being run as root. If that is the case, make a user with sudo privileges and install the package as that user. It also may complain about the existence of two files from when we installed dtrace-utils. It is safe to delete them and have dtrace-utils-devel replace them.
The Actual UEK Part
This is where things can potentially get weird, but don’t worry if you manage this, then installing Gentoo will feel like a (very long) walk in the park. Theoretically, it should be as easy as running the following commands:
cd ~/sources/linux-uek
make olddefconfig
make menuconfig
Once in the menu, make sure that ftrace is enabled. Also, I’ve found that compiling tends to fail when sunrpc is enabled, which unfortunately means no NFS. Finally, XFS support may not be enabled by default, so make sure it is:
| Kernel hacking
|-| Tracers
|-|-| [*] Kernel Function Tracer

| File Systems
|-| <*> XFS filesystem support
|-|-| [*] XFS Quota support
|-|-| [*] XFS POSIX ACL support
|-|-| [*] XFS Realtime subvolume support
|-|-| [*] XFS online metadata check support
|-| [ ] Network File Systems ----
And then make any other changes you want/need, save and exit the menu, and run make. The config that was automatically created may not necessarily be bootable, so double check the settings related to processors. I suggest not using the -j flag to speed up the process, as that can potentially hide errors. When compilation finishes, all that should be left is to run:
make ctf
make modules_install
cp -iv arch/x86_64/boot/bzImage /boot/vmlinuz-uek
cp -iv System.map /boot/System.map-uek
cp -iv .config /boot/config-uek
install -d /usr/share/doc/linux-uek
cp -r Documentation/* /usr/share/doc/linux-uek
grub-mkconfig -o /boot/grub/grub.cfg
The UEK only successfully runs ‘make install’ correctly if LILO is installed instead of GRUB, hence the cp commands which do basically the same thing.
Closing Notes
If you configured the kernel and installed it correctly, you should now be able to reboot and select the UEK as your kernel. You may have to go into “Advanced options for Arch Linux” in the GRUB menu, as it will likely default to the standard Arch kernel.
There are several reasons I leave the standard kernel installed. One, it’s a known good fallback in case something goes wrong with the UEK. Two, Pacman will make it very clear that it advises against removing the linux package because of how many other packages are dependent on it. And three, there are just enough differences with the UEK that things that work with the standard kernel may not work with the UEK (think MariaDB vs. MySQL).
I hoped this helped! If you have any questions or suggestions, comment below and I will try my best to help you.